


How to replace back-twist release Atop dials.
This guide will help you replace the ATOP twist-release ratchet dials on your shoes, as no other instructions seem to be available.
Disclaimers:
Please note, this is not an ATOP manufacturer's instruction manual.
If at any point you doubt your ability to do this work without damaging your shoes, we strongly suggest you send your shoes to us or back to the shop you bought them from, for this maintenance instead.
Any work you do on the shoes following this guide is entirely at your own risk. Any damage or consequences that may occur to yourself, your shoes, dials or more as a result is your own by nature of having carried out this work. No warranty is expressed or implied on any work you carry out on your shoes, and liability will be accepted for the results of poorly executed work on your behalf. If you decide you are capable of doing this work, feel free to read on for some tips on how the job can be done.
Feel free to contact us here for more information in sending shoes to us for maintenance.
Identify required dial rotation.
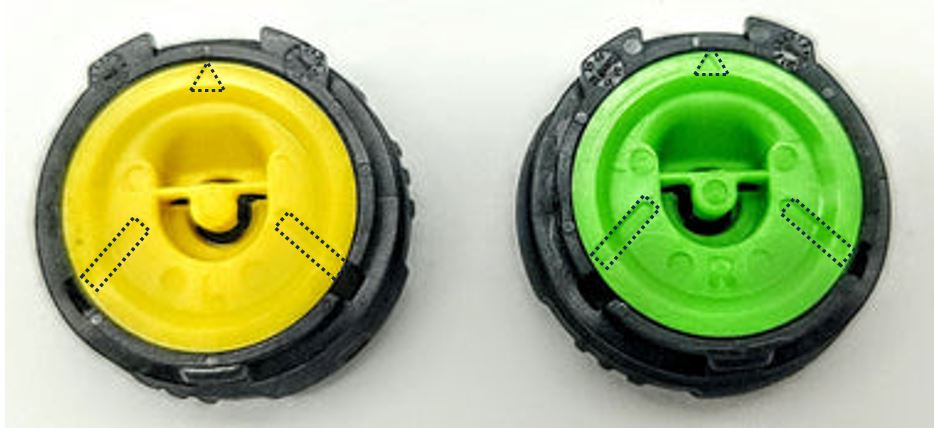
First identify whether you need a counter-clockwise tightening (counter clockwise pointing chevrons, yellow underside - left shoe for Lintaman brand shoes) or clockwise tightening (clockwise pointing chevrons, green underside - right shoe for Lintaman brand shoes) dial. Be sure you have ordered the correct dial before starting this work. Mixing up tightening direction dials can lead to inandvertent relese of the dials during riding due to mistaken use, leading to dangerous situaitons with risk of injury and worse.

The image below showing the A1 shoe's heel height variation range, illustrates why locating the correct dial roation direction is important; your muscle memory knows an outward twist is tightening. We strongly reccomend you do not substitiute different direction dials.

Identify the installation ring base and dial clip location.

If you look at the dial on the shoe, you will see that the ring it is installed inside of has a slight rise near the cable entry/exit point.
In the middle of that rise in the base ring, you will see an indentation in the dial.
Remove dial
Insert a small electronic flathead screwdriver or similar (we strongly recommend you do not use a pocket knife blade for this) and lever the indent in the dial against the ring the dial is installed in. You my see best results twisting the screwdriver.
The dial will click loose and pop out.
Observe cable routing and orient ratchet spools.
Observe the cable routing on the existing dial, and take note that if you have a looped cable setup on your A1 shoe, the outer cable routing is inserted into the upper dial hole, whereas the inner return cable loop end is routed to the bottom of the dial. If you have a single cable pull setup, the cable wil go into the upper hole. You will need to re-cable the new dial in this same manner.

rient the Y-shaped indicators on the spool of your new dials to align with the cable entry eyelets of the ratchet frame and the small triangle with the small triangle divet at the top between the “horns” of the dial’s base (as highlighted with dotted lines in the image below)
First we will undo the knot(s) around the central spoke of the spool to remove the cable(s) from the old spool.
Next thread the correct outer-route cable to the upper hole (double-check your dial orientation against the shoes dial base before you feed in the cables). If your shoe has a one-way cable, use the lower eyelet if your shoe heel is medium to high in position. Use the higher eyelet if your heel is set low.

Now tie off the end(s) of your cable(s). To ensure the cables do not work loose from the spool axle, you may decide to find a well-ventilated space and melt the knot with a lighter so that it is permanently affixed. This is not required.
You will now clip the new dial into the shoe. Orient the dial's two horns toward the two gaps in the dial base, and feed them into the base.

Then pinch the dial into the base with your fingers, and the dial will clip into the new base securely.

This is what the end result will look like (with a single cable setup).

You can now tighten the dial, with a functional shoe to ride again!